
Figuring out your car radio wiring diagram can feel like cracking a secret code, but it's really not as tough as it looks. You know, when you're thinking about getting a car, maybe like buying a used car in the summer, one of the first things you might want to do is get the sound system just right. It's almost like having the right tunes can make all the difference, whether you're heading out for a long drive or just cruising around town. Nobody wants to pay too much for insurance, but everyone wants their car to feel like their own, and a good sound system is a big part of that feeling.
Getting your car's audio setup just so can really change your daily drives. You might be upgrading an older vehicle, or perhaps, you're just fixing something that stopped working. Understanding the wires helps you avoid common headaches, like accidentally blowing a fuse or, you know, just having no sound at all. It's pretty satisfying when you get it all connected correctly, and the music starts playing clearly.
This guide will walk you through the basics of a car radio wiring diagram. We'll look at what each wire color usually means, where to find the right diagram for your particular vehicle, and some handy tips for putting it all together. You'll gain a lot of confidence, and honestly, you might even save some money by doing it yourself. It's quite a useful skill for any car owner, really.
Table of Contents
- Why a Car Radio Wiring Diagram is So Helpful
- Common Car Radio Wire Colors and What They Do
- Finding the Right Diagram for Your Ride
- Essential Tools for the Job
- Tips for a Smooth Wiring Process
- What If Things Don't Go as Planned?
- Frequently Asked Questions About Car Radio Wiring
Why a Car Radio Wiring Diagram is So Helpful
Knowing your car radio wiring diagram is, you know, pretty important for anyone looking to work on their vehicle's sound system. It's like having a map for a complicated journey. This diagram shows you exactly where each wire goes and what its job is. It really takes the guesswork out of connecting things up, which can be a big relief, honestly.
Without a diagram, you're just guessing, and that can lead to problems. You could accidentally short something out, or even damage your car's electrical system, which is something nobody wants. It's a bit like driving a car where the traffic AI is pretty annoying; you want to avoid dangerous situations, and a diagram helps you do just that with your wiring.
Making Sense of the Wires
Every wire in your car's audio system has a specific purpose. There are wires for power, wires for ground, and wires for each speaker, too. Then there are those that turn the radio on when the car is running or light up the buttons at night. A car radio wiring diagram lays all of this out clearly, showing you which color corresponds to which function. It’s a very visual way to understand what's happening.
This clear mapping helps you connect your new radio, or even just fix an old one, without confusion. You can see at a glance where the main power comes from and where the sound signals go to each speaker. It truly makes the whole process much simpler and less intimidating, especially if you're new to car electrical work.
Keeping Things Safe
Safety is, arguably, the biggest reason to use a car radio wiring diagram. Working with electricity always carries some risk, and a car's electrical system is no different. Knowing which wires are live and which are ground helps you avoid shocks or creating short circuits that could cause fires. It's like checking the safety features before you take a car out for a spin.
The diagram helps you make sure you connect everything in the right order and with the correct polarity. This protects your new radio from damage and, perhaps more importantly, keeps your car's electrical system healthy. It's a really important step for peace of mind when you're doing any kind of electrical work on your vehicle.
Common Car Radio Wire Colors and What They Do
While car manufacturers can sometimes use slightly different color codes, there are, you know, some very common standards you'll find on most car radio wiring diagrams. Getting familiar with these standard colors is a great first step, as it gives you a good starting point for any installation. It's like learning the basic rules of the road before you get behind the wheel.
These colors are pretty much universal across many vehicles, from a simple sedan to, say, a car that might be used for sprint car racing. Knowing them helps you quickly identify the main functions. It truly simplifies the process of connecting a new stereo or troubleshooting an existing setup. So, let's look at what some of these common colors mean.
Power Wires
The power wires are, well, very important. They bring electricity to your radio. You'll usually find two main power wires. One is a constant power wire, which stays on all the time, even when the car is off. This wire typically keeps your radio's memory settings, like your favorite stations. This wire is often yellow, and it's always got power, so you know, be careful with it.
The other power wire is the accessory or switched power wire. This one only gets power when your car's ignition is turned on, or to the accessory position. This wire tells your radio to turn on and off with the car. It's often red. So, in some respects, yellow is for memory, and red is for turning on and off. It's a pretty straightforward system once you get the hang of it.
Speaker Wires
Speaker wires are, arguably, some of the most numerous wires you'll deal with. Each speaker in your car needs two wires: a positive and a negative. These wires carry the audio signal from your radio to the speakers, making the sound happen. There are typically eight speaker wires for a standard four-speaker setup, two for each corner of the car.
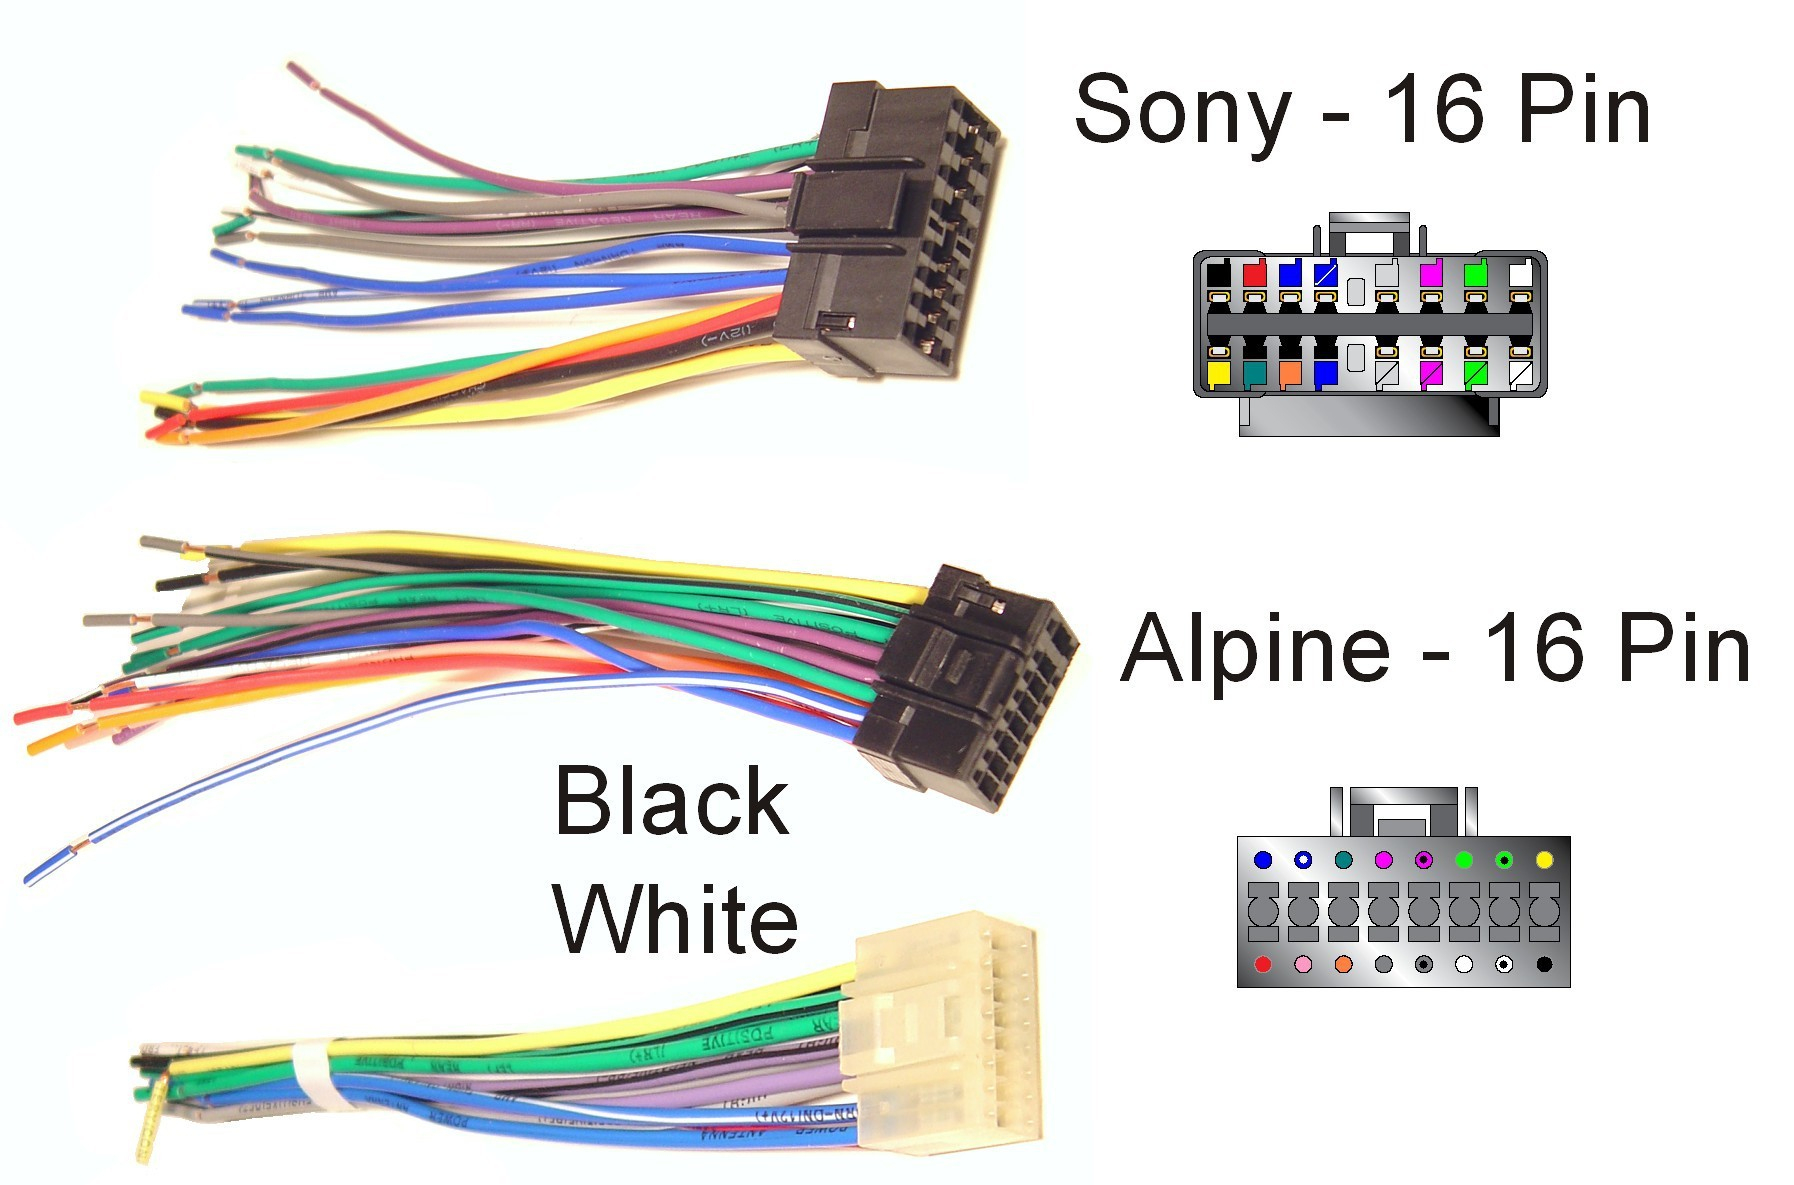
The colors for speaker wires usually come in pairs. You'll often see a solid color paired with the same color but with a black stripe. For example, white and white/black might be for the front left speaker. Green and green/black could be for the rear left. Purple and purple/black for the rear right, and grey and grey/black for the front right. It's a system designed to keep things organized, really.
Accessory and Illumination Wires
Beyond the main power and speaker wires, there are, you know, a few others that serve specific functions. The accessory wire, as mentioned, is often red and tells the radio to power up when the car is on. Then there's the illumination wire, which usually connects to your car's dashboard lights. This wire dims the radio's display when you turn on your headlights, which is a neat feature.
The illumination wire is often orange or blue, or sometimes orange with a white stripe. It helps your radio blend in with the rest of your car's interior lighting at night. There might also be a blue wire for the power antenna or an amplifier turn-on signal. These are, basically, signals for other components to activate, which is pretty clever, actually.
Ground Wires
Every electrical circuit needs a ground connection, and your car radio is no exception. The ground wire provides a safe path for electricity to return to the car's chassis or battery. Without a good ground connection, your radio simply won't work, or it might work poorly, with static or buzzing sounds. This wire is, almost always, black.
Connecting the ground wire properly is, in fact, incredibly important for both the radio's performance and your safety. It helps prevent electrical issues and ensures a stable connection. So, when you're looking at your car radio wiring diagram, the black wire is one you'll want to pay very close attention to, as it's fundamental to everything else working correctly.
Finding the Right Diagram for Your Ride
Getting the correct car radio wiring diagram for your specific vehicle is, well, very important. Cars are different, just like how a BMW E36 might have a different setup than another car. What works for one car might not work for another, so you really need to find the exact diagram for your make, model, and year. It's like finding the right key for a specific lock, you know?
Using the wrong diagram could lead to a lot of frustration, or even damage. You want to be absolutely sure you're looking at the right information before you start connecting anything. There are a few places you can look to get this crucial piece of information, and it's worth taking the time to find the accurate one.
Checking Your Car's Manual
The first place to look for a car radio wiring diagram is, honestly, your car's owner's manual. Many manuals include detailed diagrams for the vehicle's electrical systems, including the stereo. This is often the most accurate source, as it comes directly from the manufacturer. It's like getting information straight from the horse's mouth, so to speak.
If you don't have the physical manual, you might be able to find a digital version online on the car manufacturer's website. Just search for your car's make, model, and year, plus "owner's manual." It's a pretty good starting point, and sometimes, it's all you need to get the job done right.
Online Resources and Forums
If your owner's manual doesn't have the diagram, or you just can't find it, online resources are, basically, your next best bet. There are many automotive forums and websites dedicated to car audio or specific car models. You can often find diagrams shared by other enthusiasts who have already done the same work on their cars. It's like a community helping each other out, which is pretty cool.
When using online sources, it's a good idea to cross-reference information from a few different places if you can. This helps ensure accuracy, as sometimes, you know, diagrams can vary slightly. Forums like those for sprint car general discussions or even just general car memes can sometimes point you to helpful resources, believe it or not.
Aftermarket Stereo Instructions
If you're installing a new aftermarket car stereo, the wiring diagram for the new unit will come with its own instructions. This diagram shows you what each wire coming out of the new radio is for. You'll then need to match these wires to the corresponding wires in your car's factory harness, using your car's specific wiring diagram. It's a two-part puzzle, really.
The new radio's diagram is usually pretty clear and easy to follow. The main challenge is correctly identifying the wires in your car's dashboard. That's where your car's specific car radio wiring diagram becomes incredibly useful. So, you'll be using both sets of instructions to make sure everything connects perfectly.
Essential Tools for the Job
Before you start pulling wires, having the right tools makes the job, well, much easier and safer. You don't need a whole workshop, but a few basic items are, in fact, pretty essential. Having these things ready saves you from stopping halfway through to run to the store. It's like preparing for a trip; you pack what you need beforehand.
You'll definitely want a wire stripper/crimper tool. This lets you cleanly remove the insulation from wires and securely attach connectors. A multimeter or a test light is also incredibly useful for checking for power and identifying wires. Some electrical tape or heat shrink tubing is good for insulating connections. You'll also want some wire connectors, like crimp caps or solder. A set of screwdrivers or a panel removal tool can help get your dashboard apart without causing damage. These tools just make the whole process much smoother, you know?
Tips for a Smooth Wiring Process
Working with car radio wiring diagrams can be, you know, a bit delicate, so having some good tips can really help. These suggestions are about making the process as straightforward and safe as possible. It's like when you're learning how to shop for a used car; there are steps you follow to make sure you get a good deal and avoid problems. These tips help you avoid common mistakes.
Taking your time and being patient is, honestly, one of the best pieces of advice. Rushing can lead to errors, and fixing those errors often takes more time than doing it right the first time. So, just breathe, and follow these simple steps for a better outcome, basically.
Disconnect the Battery First
This is, perhaps, the most important safety step. Always disconnect your car's negative battery terminal before you start any electrical work. This completely removes power from the system, preventing accidental shorts, sparks, or even electric shocks. It's a simple step that really protects both you and your vehicle. Seriously, don't skip this one.
Just use a wrench to loosen the nut on the negative terminal, and then carefully lift the cable away from the battery post. You can tuck it away from the battery so it doesn't accidentally touch again. This simple action makes working on your car's wiring much, much safer, you know?
Test Your Connections
As you make each connection, it's a good idea to test it if you can. Once you've connected a set of wires, like the power wires, you can temporarily reconnect the battery and use your multimeter to confirm power is flowing where it should. Then, disconnect the battery again before moving on to the next set of wires. This step helps catch problems early.
For speaker wires, you can even do a quick test by connecting one speaker and playing some audio at a very low volume to ensure you have sound. This step, while a little extra effort, really saves a lot of headaches down the road if something isn't working right. It's like checking your work as you go along, which is always smart.
Secure Your Wires
Once you've made your connections, it's, you know, pretty important to make sure they are secure and insulated. Use crimp connectors, solder, or good quality electrical tape to make sure the wires won't come loose. Then, use electrical tape or heat shrink tubing to cover any exposed metal parts of the connections. This prevents short circuits and keeps things tidy.
Loose or exposed wires can cause all sorts of problems, from intermittent sound to more serious electrical issues. Taking the time to properly secure and insulate each connection means your radio will work reliably for a long time. It's a small detail that makes a big difference in the long run, honestly.
Double-Check Everything
Before you put your dashboard back together, take a moment to, well, double-check all your connections against your car radio wiring diagram. Make sure every wire is connected to its correct counterpart. Check for any loose wires, exposed metal, or anything that just doesn't look quite right. It's like doing a final inspection before you finish a big project.
This final review can catch any small mistakes you might have overlooked during the process. It's a quick way to ensure everything is perfect before you power up your new radio for good. This step, in a way, gives you that extra bit of confidence that you've done the job correctly.
What If Things Don't Go as Planned?
Even with a good car radio wiring diagram and careful work, sometimes things, you know, just don't go perfectly. Maybe the radio doesn't turn on, or there's no sound, or it sounds weird. Don't worry, it happens to everyone. The key is to stay calm and systematically figure out what's going on. It's like when you're driving and the traffic AI randomly decides to provoke a dangerous situation; you react calmly and try to fix it.
Troubleshooting is just a process of elimination. You go back through your steps and check common problem areas. It's usually something simple that was overlooked. So, don't get discouraged if your radio doesn't fire up on the first try, because it's pretty common.
Troubleshooting Common Issues
If your radio isn't working, first, check the fuses. There's usually a fuse on the back of the radio itself, and fuses in your car's fuse box. A blown fuse is a very common reason for no power. Next, re-check your power and ground connections. Make sure they are secure and getting proper voltage with your multimeter. A loose ground is a frequent culprit for poor sound or no power at all.
If you have power but no sound, check your speaker connections. Make sure each speaker wire is connected correctly and not shorting out against another wire or metal. Also, verify that the speaker wires aren't reversed (positive to negative), as this can cause very strange sound. It's often one of these simple things, honestly.
When to Ask for Help
Sometimes, despite your best efforts, you might just get stuck. If you've gone through all the troubleshooting steps and still can't figure it out, it's, you know, perfectly fine to ask for help. Car audio shops or experienced mechanics can often diagnose problems quickly. They have specialized tools and knowledge that can save you a lot of time and frustration.
You can also turn to online car forums, like those for specific car models or general automotive discussions. People there are often very willing to share their experience and offer advice. Remember, there's no shame in seeking a little assistance when you need it. It's a pretty complex system, and sometimes, a fresh pair of eyes can spot what you missed.
Frequently Asked Questions About Car Radio Wiring
What are the standard car radio wire colors?
While there can be some small differences, common car radio wire colors usually follow a pattern. You'll typically find yellow for constant power, red for switched accessory power, and black for ground. Speaker wires often come in pairs, like white and white/black for the front left speaker, green and green/black for the rear left, purple and purple/black for the rear right, and grey and grey/black for the front right. There are also wires for illumination, usually orange or blue, and a blue wire for a power antenna or amplifier turn-on signal. It's a fairly consistent system, you know.
Can I wire a car radio without a wiring harness?
You can, technically, wire a car radio without an aftermarket wiring harness, but it's, honestly, not recommended for most people. A wiring harness adapter connects your new radio's wires directly to your car's factory wiring without cutting any of the original wires. This makes the installation much cleaner and easier to reverse if needed. Wiring without a harness means you'll have to cut and splice into your car's factory wires directly, which can be more difficult and risky. It's often worth the small cost of a harness adapter for the simplicity and safety it provides, really.
How do I find the wiring diagram for my specific car?
The best place to start looking for your specific car radio wiring diagram is, in fact, your car's owner's manual. Many manuals include detailed electrical diagrams. If you don't have the manual, you can often find digital versions on your car manufacturer's official website. Online automotive forums and dedicated car audio websites are also great resources where other car owners often share diagrams. Just be sure to search for your exact car make, model, and year to get the most accurate information. It's pretty important to get the right one, you know?
Learn more about car audio on our site, and link to this page for more great tips.


Detail Author:
- Name : Jefferey Hayes
- Username : alana.ankunding
- Email : unader@ratke.biz
- Birthdate : 1995-05-13
- Address : 228 Kuphal Estates Murphystad, ID 95751
- Phone : 1-804-335-8570
- Company : Morissette Inc
- Job : Pharmacist
- Bio : Ut ut impedit alias qui dolor. Consequuntur ut reiciendis aut. Sit fugit qui eos quae. Repellat minus iure aliquam qui. Repellat optio explicabo iusto molestias quis esse tempore nihil.
Socials
linkedin:
- url : https://linkedin.com/in/eileenlindgren
- username : eileenlindgren
- bio : Est sunt ipsum officia non inventore sunt optio.
- followers : 3889
- following : 186
facebook:
- url : https://facebook.com/eileen_dev
- username : eileen_dev
- bio : Voluptas ducimus quibusdam voluptatibus qui vel fuga repudiandae.
- followers : 2108
- following : 1322
